Homedit.com Interior Design & Architecture Inspiration Newsletter | .png) |
- The Revolutionary Hoxton Hotel in London
- The Extraordinary Memory Board
- The Beauty of a Loft by Mikel Larrinaga
- The perfect table for your paper work
- New York’s most expensive estate listed at $100 million
- The futuristic spiral coffee table
- Learn to Share in This Modern New Market Road Apartment
- Clean and airy kitchen makeover
- The Harmonia Duplex Apartment – the perfect place to come home
- 21 Creative DIY Lighting Ideas
| The Revolutionary Hoxton Hotel in London Posted: 06 Aug 2012 09:48 AM PDT The Hoxton Hotel is a revolutionary building but not as seen at the present moment. It doesn't have a futuristic design. However, when it first opened in doors back in 2006, it was a very inspiring project. It served as a model for many of London's hotels. The innovation was not related to style in particular. The major element that impressed everyone else was the great balance between the budget used to build the hotel and the extremely stylish result.
The hotel sits on what used to be an old car park, close to the Liverpool Street railway station. It's a luxurious hotel with a very well designed structure. The style chosen was a mix of industrial and glamorous elements. The result was a casual and yet sophisticated look with lots of interesting details. The hotel has six floors and a total of 205 guest rooms. The rooms were designed to be comfortable and inviting, without sacrificing style.
All the rooms feature puffy duck-down duvets, 300 count thread linen bedding and comfortable mattresses. The walls of the rooms are not covered with artwork or posters, instead, sketches of the London's skyline were created. It's a simple and chic detail. And the hotel also has a surprise for all those vising the city for the Olympics: five rooms available for just £1 for the period between July 1 and September 30. Subscribe to Homedit's Feed to get constant updates of our Awesome Posts!© Homedit- Daily interior design ideas ! | Permalink to The Revolutionary Hoxton Hotel in London |
| The Extraordinary Memory Board Posted: 06 Aug 2012 09:00 AM PDT This product reminds me of my grandmother’s house. And it’s true that she always knew where her keys were and of course she never forgot the things she had to buy from the grocery store. The Marina Memo Board not only gives you the possibility to relive your childhood but is a very useful piece that can easily fit in your kitchen or your hallway.
It creates a perfect corner for you to put all the important things you have to take care of, such as shopping lists, notes or reminders. But it remains also the place where you can simply write a love note for your partner. So, the Marina Memo Board is an object that can bring a smile on the face of you loved ones. All the pieces in the picture are included, so you receive it assembled and with chalk or eraser. The only job for you is now to think of cute messages to write there, because this is the only option that the board doesn’t have. Otherwise, is a cute piece of furniture that reminds you event to take your umbrella when it’s raining, because is always there for you.
And, there’s nothing for you to do. You just have to buy it and put it on your wall. From there, you’ll have a piece of furniture that tells you not only where your keys are, but also reminds you to pay your bills. And it still brings an elegant tone to the room where you put it, because of his old and still fancy style. Only for 59,00₤. Subscribe to Homedit's Feed to get constant updates of our Awesome Posts!© Homedit- Daily interior design ideas ! | Permalink to The Extraordinary Memory Board |
| The Beauty of a Loft by Mikel Larrinaga Posted: 06 Aug 2012 08:18 AM PDT The loft in the picture is twice a treasure. First, thanks to the views it provides over the Old Quarter of Bilbao and then, thanks to the beauty of the interior, work of the interior designer, Mikel Larrinage. Everything was created around some central ideas. One of them is that everything must be outside obstacles; the reform is around the terrace, an open space loft and here everything connects with the outside environment.
Another central idea is that of labor search – each object has a story to tell. No matter if there are the paintings, the pictures, you have the chance of an illustrative lesson on how to frame and place artwork with sensitivity and accuracy. Nothing compares to the ideal: the studied compositions on the walls providing an inviting pure balance. The result is a diaphanous apartment, full of light, very cozy and with actual lines.
The play of surprise elements that can be seen from place to place is attractive and the whiteness makes the space even more spacious and cozy. No matter where you look, you see personal details, memories and works of art; nothing compares to the unique feeling they create and to the atmosphere that reveals good taste, personality and interest in everything that stands for art. The terrace in itself is a private oasis, impossible not to like, just as everything related to this space.{found on nuevo-estilo}. Subscribe to Homedit's Feed to get constant updates of our Awesome Posts!© Homedit- Daily interior design ideas ! | Permalink to The Beauty of a Loft by Mikel Larrinaga |
| The perfect table for your paper work Posted: 06 Aug 2012 07:48 AM PDT The place where we put our laptop or our PC is a very special place for each of us. That’s because in the last few years we got to spend a lot of time in front of these electronics. In fact, they became a part of us and we never seem to find the right corner for our usual activities that involve these new technologies. Well, this table seems to be the perfect match for your computer. Created by the young designer Manuel Welsky, this original idea is called Klemmbert (Clipboard in German) Blue Table. The table has this name because it actually works like a clipboard that clips in to the desk top. Blue because of the color of the steel that supports it.
We all need a lot of space when we have to do paper work. With his innovative design, Welsky’s Klemmbert Blue Table fits in every home and gives you plenty of space to put your things when you`re working at a project or simply studying for your exams.As I said before the table’s legs are made from stainless steel and the above part is from oak veneer.
The table has already been introduced to the public at DMY International design in 2010 in Berlin and also at the Blickfang design Fair in Vienna.The dimensions being 75 cm Height, 160 cm Width and 80 cm Depth, with a simply but still modern design, the table is perfect for you to spend your day doing unfinished projects for work. And all this for only 369₤. Subscribe to Homedit's Feed to get constant updates of our Awesome Posts!© Homedit- Daily interior design ideas ! | Permalink to The perfect table for your paper work |
| New York’s most expensive estate listed at $100 million Posted: 06 Aug 2012 06:26 AM PDT There are many expensive properties in New York as well as well as all over the world. However, this one managed to reach the top of the list. It's a penthouse sitting atop the CitySpire condominium and it's currently listed at $100 million thus becoming the most expensive estate in New York.The penthouse has an octagonal shape and it was bought by Steven Klar, Long Island based real-estate developer and the president of the Klar Organization, in 1993.
At that time he paid only $4.5 million for the property. It occupied three full floors (73rd, 74th and 75th) and it covers an area of 8,000 square feet. The penthouse features a total of six full bedrooms and nine full bathrooms. It also includes a media room, a conference room, a formal gallery as well as a large dining room that can accommodate 20 persons.
The penthouse has an internal elevator that provides access to all three floors. O the 73rd level there's a wine closet where 1,000 bottles can be stored. The 75 floor contains the grand master suite and a sitting room with panoramic views over Central Park. The penthouse is equipped with state-of-the-art technology including integrated speakers and electronically time-controlled shades. Steven Klar has lived in this impressive penthouse apartment for almost 17 years. Currently, the estate is listed at the fabulous price of $100 million.{found on businessinsider}. Subscribe to Homedit's Feed to get constant updates of our Awesome Posts!© Homedit- Daily interior design ideas ! | Permalink to New York's most expensive estate listed at $100 million |
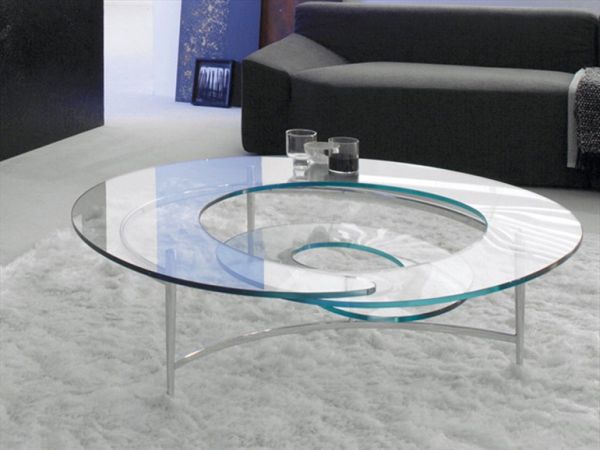
| The futuristic spiral coffee table Posted: 06 Aug 2012 03:50 AM PDT Some designs are focused on functionality while others on looks. It's a fact that establishes a balance between these two styles. However, most often there is a little of both sides. The Spiral coffee table has a design that makes it apparent that the goal is to impress. It's a piece of furniture designed to serve as an accent feature, as a focal point. Still, this doesn't mean that it lacks functionality.
It's true that, given the spiral shape of the table, the usable surface is smaller and thus less functional. However, a coffee table is by definition a decoration, just as much as a practical piece of furniture. The Spiral coffee table was designed for Cattelan Italia. It features a base crafted from steel. The base can have either a chromed or silver finish. It has a lacquered surface and this gives it a sleek and glamorous look.
The table also features a top, the most impressive part of the design. The top is made of curved glass that can either be clear, frosted or black. All versions are beautiful but their visual impact differs with the finish. A black table would have a more dramatic look while a clear glass top would allow it to also impress but in a more subtle and delicate way. The Spiral coffee table is a contemporary creation and would make a strong focal point. Subscribe to Homedit's Feed to get constant updates of our Awesome Posts!© Homedit- Daily interior design ideas ! | Permalink to The futuristic spiral coffee table |
| Learn to Share in This Modern New Market Road Apartment Posted: 06 Aug 2012 02:58 AM PDT When you come from a family with many members you are used to make all sorts of compromises and share everything you have with them. Usually single kids that have no brothers or sisters are more selfish and spoiled than the others that have a brother or a sister. They are used to get everything and think that everything belongs to them and they are supposed to get what they want all the time.
The owner of the modern New Market Road Residence is a lady who lives with her mother and thus she is used to share everything with her although it is possible to have their own privacy at the same time.KNQ Associates took care of their 550 square feet one bedroom HDB apartment renovation and made this thing possible. The apartment is located in Singapore and consists of many multifunctional pieces of furniture in order to increase the storage space and due to the fact that two persons use it. The white wall mounted storage unit on the hall or the shoe bench used also as additional seating are just two examples.
White seems to be the dominant nuance all over the place and the mirrored walls help it to increase the amount of light and make the impression of a more spacious area. The living area has many grey nuances used for the comfortable sofa but blue and black accents seem to bring a little bit of more color.
The kitchen which is a combination of white and silver seems a space invaded by light although a blue wall appears to break this clear crystal image. Though the bedroom is a common space the two beds are separated by a white and blue storage unit which has the shape of a wardrobe and offers private areas to the two persons. The whole apartment inspires warmth, friendship and harmony and definitely represents a place where you can learn to share and see how to live within a family. Subscribe to Homedit's Feed to get constant updates of our Awesome Posts!© Homedit- Daily interior design ideas ! | Permalink to Learn to Share in This Modern New Market Road Apartment |
| Clean and airy kitchen makeover Posted: 06 Aug 2012 01:20 AM PDT This is a large but not particularly spacious kitchen and, as we all know, there's never too much free space in this room. Its owners decided to give it a makeover and to make it a little more airy. The original décor was mostly traditional and it wasn't as bright as it should have been. It was warm and inviting but it was also old and outdated. It was time for an update.
The renovation took the owners 5 months to complete. During this time they had to make some major changes. They opted for a clean and simple décor with a subtle industrial feel. They wanted to be airy and bright but also warm and inviting.
The storage options posed problems. It took the owners a lot of time to decide where everything would go because, even though they were particularly sure of what they wanted for their new kitchen design, they knew what they didn't want and that was all kinds of small appliances scattered all over the place and on the counters.
They wanted everything to be tucked away and out of sight so that the kitchen could be organized, clean and airy at all times. This shows us that it's very important to plan everything before toy get to work. Every little detail is important and it can change the whole design. Some things can be changed after that but it's best to stick with the initial plan.{found on designsponge}. Subscribe to Homedit's Feed to get constant updates of our Awesome Posts!© Homedit- Daily interior design ideas ! | Permalink to Clean and airy kitchen makeover |
| The Harmonia Duplex Apartment – the perfect place to come home Posted: 05 Aug 2012 11:26 PM PDT Who says there’s no hope for a classic flat to become a modern one? The designers from the Brazilian studio Estudio Guto Requena proved that they could bring modern air into a duplex apartment from a neighborhood of the Brazilian city, São Paulo.A mixture of classic and modern, the apartment is the perfect place to live for a single person or young couple, without children, that enjoys luxury but still loves the antiques. Luxurious because the flat is equipped with new furniture and appliances. Antique because the designers added to the modern atmosphere few objects, as a typewriter, that keeps it cozy.
The apartment has two levels, each of them with fully equipped spaces. In fact, the beauty of this flat consists in the perfect mixture between the wide spaces and the natural light that surrounds the place. The link between the two levels is made by a modern designed stone ladder that takes up very little space.
The lower level is the ideal place for you to spend the day because it brings together the modern kitchen, the dining room and the stylish living room. The kitchen becomes then a perfect spot for your morning coffee, but still remains a pleasant place to cook. As for the living room, there`s the corner for you to watch a movie, read a book or simply chill with your friends. The level has his own bathroom.When the evening comes, the top floor terrace becomes a good place for you to watch the sunset, and enjoy the city-view. The terrace keeps a bohemian but still modern atmosphere, surrounded by plants and fresh air.
The upper level hosts the new-made bathroom and the fancy bedroom, with a big comfortable bed and a giant TV, the perfect place where your day should end.A very nice combination of stone and glass, the apartment is the perfect place to come home after a busy day at work. Subscribe to Homedit's Feed to get constant updates of our Awesome Posts!© Homedit- Daily interior design ideas ! | Permalink to The Harmonia Duplex Apartment – the perfect place to come home |
| 21 Creative DIY Lighting Ideas Posted: 05 Aug 2012 10:00 PM PDT There are so many different types of lighting and they are all unique. In this huge and complex collection of lamps, pendants, chandeliers and all sorts of fixtures, finding the one that bests suits your needs and preferences is an almost impossible task. But there are ways in which you can design them yourself. These so called DIY projects give you more freedom and allow you to choose the materials, design, color and all the other details. Let's take a look at some ideas.
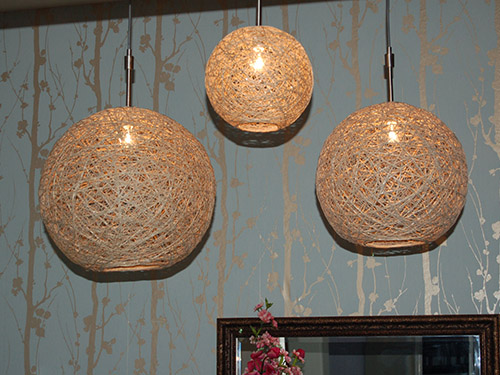
1. Hemp string pendant lamp.
They seem so complex and yet they are so easy to make. These pendant lamps are a great week-end project. To make one you need bouncy balls, clear drying craft glue and, of course, hemp string. If you use a 16'' diameter ball you'll need 400 yards. For a 14'' diameter ball – 300 yards and for a 9'' diameter ball only 100 yards. First draw a circle on the ball. This circle represents the portion of the lamp that needs to remain clear of string. Then start applying the glue and wrap the hemp around the ball. Then use the inflating needle to deflate the ball and remove it from the lamp. Install the wires and hardware and your pendant lamp is done.We covered this project few weeks ago. 2. Stainless steel pendant light.
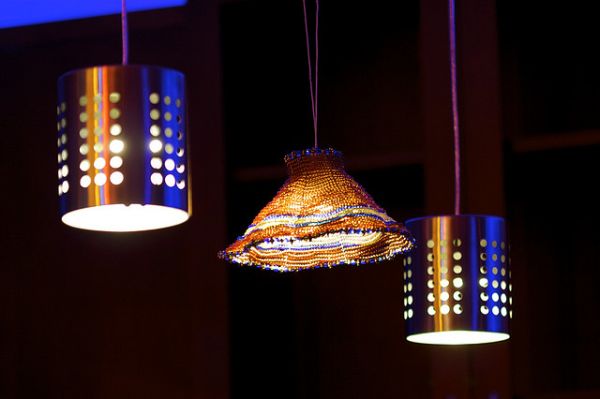
This type of pendant lamps would look best in the dining room or above a breakfast bar or in the kitchen. They are made of modified silverware caddies. They are very easy to make and all you need to do is attach the cord, hardware and wires. You could also paint them if you prefer a different color.{found on ikeafans}. 3. Book lampshade.
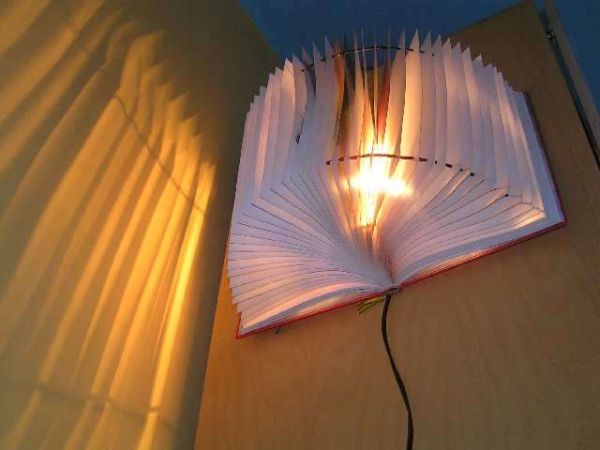
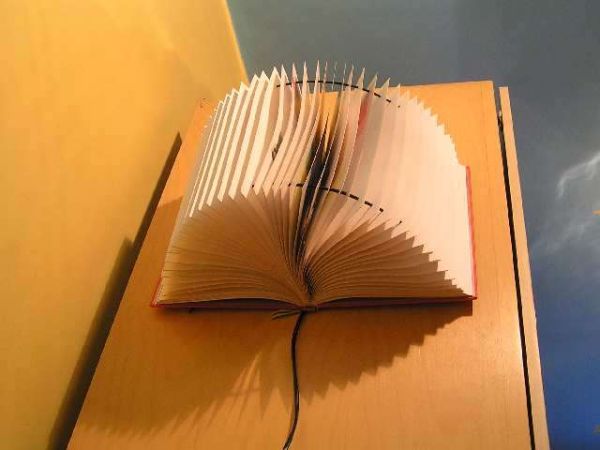
It might not seem like a good idea to combine a book with a light bulb. But, when you think about it, the pages of the book could create a very beautiful effect, especially when the light is diffused and spread through them. The project is extremely simple. All you have to do is find a big book that you are willing to sacrifice and cut a rectangular part just like the picture shows. Then install the cord and hanrdware and attach it on the wall.{found on instructables}. 4. Snowball wall light.
This Snowball light is made from basket-style coffee filters, a sheet of hardware cloth and a string of LED lights. These are basic elements that almost anyone has in their home so you wouldn't even have to leave the house for this project. You can fill the blanks related to the actual process. If you want you can also dip the ruffles of the coffee filters in paint.{found on craftynest}. 5. Bamboo orb pendant lamp.
Visually, these pendant lamps resemble the hemp string versions presented at no.1. They were inspired by the Cassiopeia chandelier and they are made using bamboo strips and a single CFL bulb. The bamboo comes from a bamboo roman shade and it's a flexible material that allows you to bend it as you please. You'll also need wood glue, mini spring clamps, a light cord kit and scissors. Cut the strings, apply wood glue and form a circle. Secure it with a mini spring clamp and do the same for 20 more pieces. Intersect them into the shape of an orb and glue the circles as you attach them.{found on craftynest}. 6. Folded paper lamp.
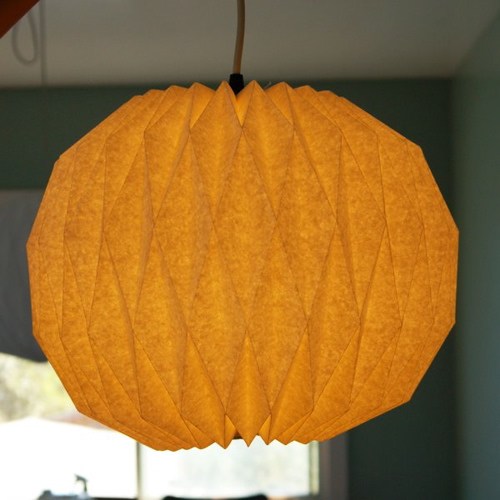
Paper lamps are delicate and beautiful and, with a little, patience you can make one on your own. It will take you around 6 to 8 hours to make a lamp but, once it's complete, you'll most definitely be proud of what you have done. It's not difficult, it's just takes a lot of time. Most of this time will be spent folding so you'll be able to do it while watching a movie or doing something else.{found on site}. 7. Tulle pendant lamp.
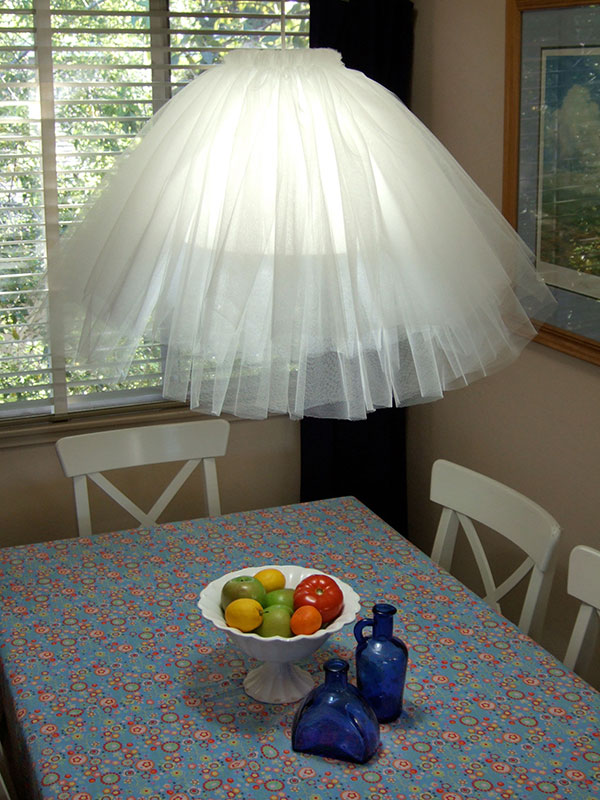
This is another easy-to-make pendant lamp and this time you'll be using tulle. You'll need 10 yards of 54'' wide tulle, embroidery floss, a light bulb, a pendant lamp (in this case Melodi pendant lamp), a large embroidery needle, a rotary cutter and mat, safety pins and a straight edge. Start by cutting a 17'' wide strip of tulle, fold the larger piece so that one side is 17'' and the other 20'' and you'll have three layers. Use safety pins to secure them together. Sew a simple running/basting stitch one inch from the edge of the fold and remove the safety pins. Overlap the right and left sides and wrap everything around the lamp. Tie a knot and insert the cord and light bulb.{found on craftynest}. 8. Tree branch chandelier.
To make a similar chandelier you'll first have to choose some branches that you like, clean them, remove the twigs and any loose bark. Then screw the branches together. You'll also need some lamp cord, small candelabra sockets, some ¼ IP nipple and a light canopy. Wire the candelabra sockets together and screw them onto the nipples. Add the cord and he chandelier is done.{found on apartmenttherapy}. 9. Faux capiz chandelier.
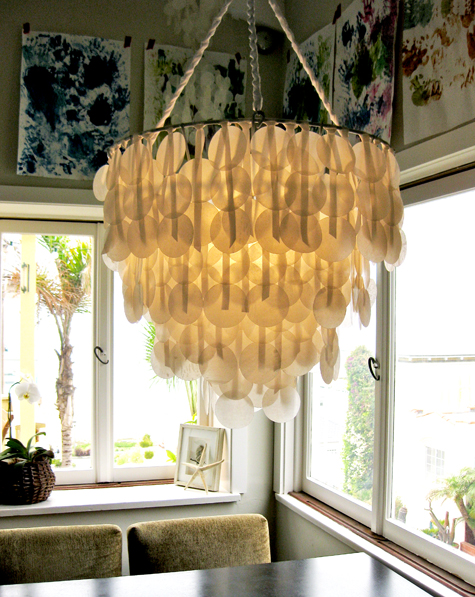
While very beautiful and good-looking, this looks like a complex and complicated project. Well, it takes a lot of time to make but it's actually not that difficult. You need white spray paint, ribbon, scissors, 1 or 2 rolls of wax paper, 2 big pieces of parchment paper, an iron, a hot glue gun, a circle cutter and a cutting mat. Start with a planter basket and spray paint it. Then start making the capiz shells. Cut three pieces of wax paper about the same length and place in between parchment paper. Iron them. Cut ribbon pieces and attach them to the planter basket. Attach the capiz shells until you cover the basket and it's all done.{found on designsponge}. 10. Glass bottle pendant lamps.
Colored glass bottles can be recycled and repurposed in many different ways. For example, you can use them to make beautiful chandeliers. All you have to do is lightly cut the bottom of the bottle and fasten it to a piece of wood or metal. Pass through electrical equipment and electrical cords and it's complete.{found on styleitchic}. 11. Diamond ribbon lampshade.
This one is a particularly simple project. It requires 10 yards of cotton herringbone ribbon, a lampshade measuring 8'' H x 9'' W, a chopstick, a hot glue gun, tape measure and a pencil. First decide how far apart you want to space the diamonds and mark these spaces. Then lay a strip of ribbon diagonally across the lampshade and move the ribbon one mark ahead on the bottom portion of the shade. Secure everything with a pink and attach the ends of the ribbon to the lampshade with hot glue. Next, place a strip of ribbon on top of one of your initial pieces and repeat until you cover the whole lampshade.{found on curbly}. 12. Globe pendant lamp.
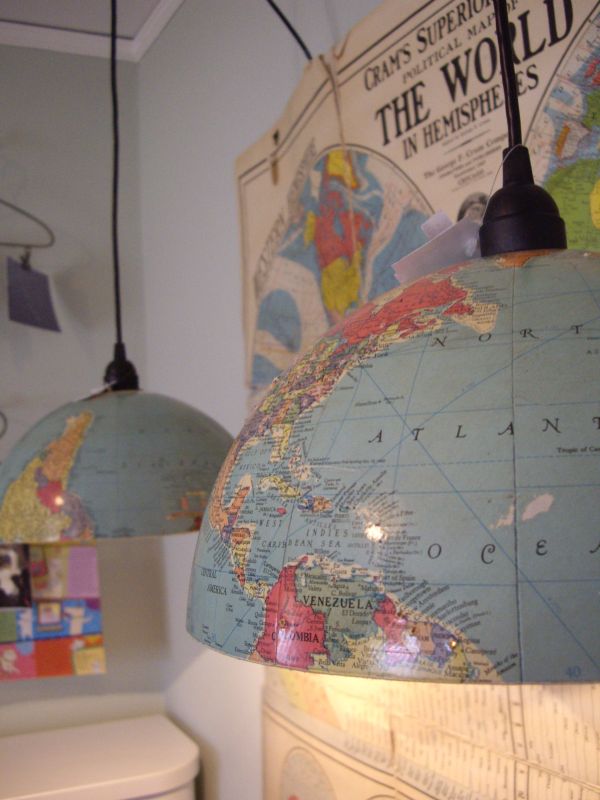
Globes are usually displayed on shelves or as a collection. But if you want to use them in a more creative way, try making a pendant lamp. Cut the globe into halves and hang them from the ceiling after you have installed the cord and wires. You'll be able to make two pendant lamps from one globe, one from each hemisphere.{found on Rosebud’s Cottage}. 13. Ruffled ribbon lampshade.
As in most cases, this is a project that requires patience and time. First, gather all your supplies. They should include 9 yards of cotton twill ribbon, a lampshade (the one in the pictures measures 9'' H x 11'' W), a chopstick, a hot glue gun, a ruler and a pencil. Using the ruler and the pencil, draw a line to help you guide the ribbon down the lampshade. You should also make tick marks where the glue needs to be placed. Secure the end of the ribbon to the top of the lampshade and use the chopstick to make a ruffle. Use glue to secure it in place and repeat the process until you reach the bottom. Do the same for the rest of the lampshade.{found on curbly}. 14. Drop cloth lamp.
For this lamp you'll need some wood that can either be left unfinished or painted. First cut the legs, the upper and lower rails, the center rails, the light support, the upper dowels and lower dowels. Sand them with sandpaper. Then measure 1-1/2″ from the top end of each leg and mark the locations for the holes. Glue and insert the ends of the upper dowels and then attach the upper and center rails. Attach the light support and the upper dowels. Finally, cut four canvas panels 6″ wide by 15″ long and wrap one end around an upper dowel. Glue the fabric to the dowel and repeat for the remaining parts.{found on lowescreativeideas}. 15. Candle holder pendant shades.
These pendant lamps are designed for outdoor use. To make some similar one you need to cut the bottoms from candle holders and to fit them around basic pendant lights. You'll be able to create a dabbled light effect, perfect for your outdoor dining area.{found on hgtv}. 16. Recycled wine bottle torch.
This is also an outdoor feature. It allows you to turn an everyday bottle into a tiki torch for your outdoor area. You need an empty wine bottle, Teflon tape, a copper top plate connector, a 1''split ring hanger, ½'' x 3/8'' copper coupling, two hex nuts, two #10 x 1" zinc plated wood screws, 3/8'' -16 zinc plated threaded rod, a tiki replacement wick and torch fuel. You'll have to make a hanger first and then to work with the actual bottle.{found on designsponge}. 17. Plastic glass pendant lamps.
Something as common and simple as a plastic glass can be turned into a beautiful pendant lamp. You just need a little imagination. Just take the glass and wrap it in colorful fabric. You can make multiple lampshades and attach them to a thread and them hang them above the bed or anywhere you want them to go.{found on veetje}. 18. Mason jar pendant lamps.
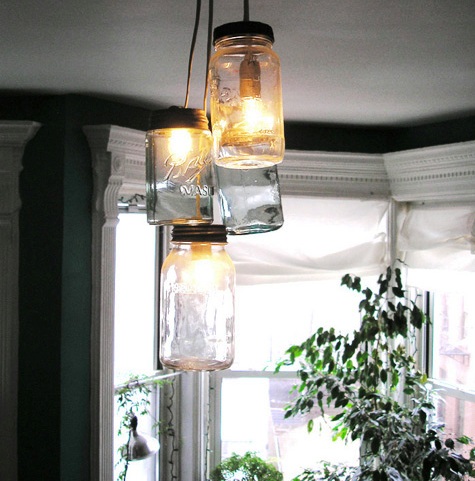
If you have the time, this would make a great week-end DIY project. It involves mason jars and at the end you'll be able to create a very beautiful display for your home. It would be best if you had high ceilings for this one. You'll need jars, a hanging lamp kit and a ceiling light place. 19. Mason jar hanging candelabras.
Mason jars can also be used to make beautiful hanging candelabras such as this one. For this project you need one-foot-wide plywood boards, rope, and Mason jars. Each jar needs to be filled with an electric tea-light candle and they will provide soft and diffuse light, perfect for the seating area or dining room. They create a warm and cozy atmosphere and they're also versatile.{found on martha}. 20. Garden lanterns.
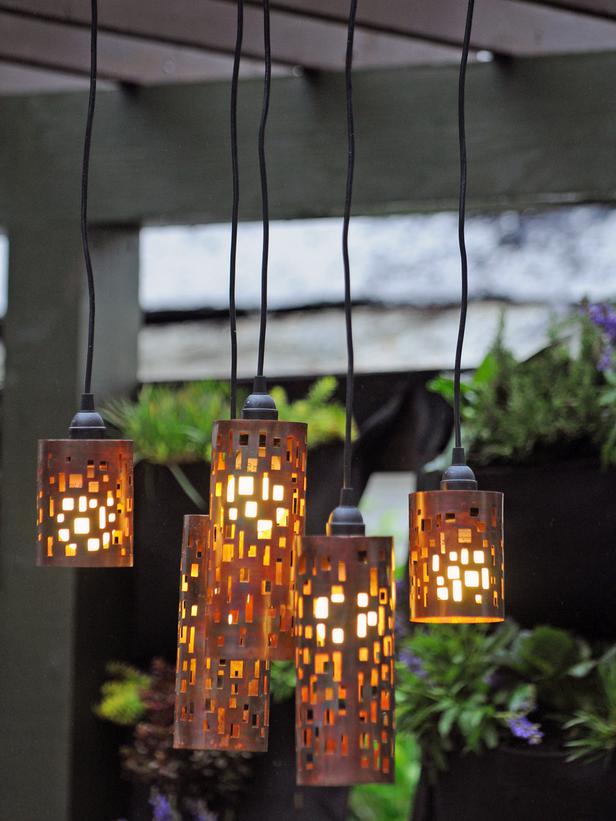
Your garden can benefit from a DIY lamp as well. You can make punched-tin lanterns. They are simple, easy to make and quite ingenious. Most of the materials for this project are things you usually throw out. You can come up with your own design for them, something personalized, something that would go nicely with your garden. You can also paint them in any color you want.{found on site}. 21. Outdoor concrete lamp.
For this project you'll need to use a mold. You get to decide the dimensions as well as the shape. It would be best to make it as simple as possible. You can use plywood for this part. Then apply a few thick coats of varnish or lacquer. This way the surface will be smooth and the mold will be protected from water. Next it's time to add the wiring. For this you can use Styrofoam. For the demolding, start with the simplest sides and continue with the rest. Then let the concrete dry a little more. Next, install a bulb and you're done. Subscribe to Homedit's Feed to get constant updates of our Awesome Posts!© Homedit- Daily interior design ideas ! | Permalink to 21 Creative DIY Lighting Ideas |
| You are subscribed to email updates from Home Decorating Trends To stop receiving these emails, you may unsubscribe now. | Email delivery powered by Google |
| Google Inc., 20 West Kinzie, Chicago IL USA 60610 | |


















0 comments:
Post a Comment