Homedit.com Interior Design & Architecture Inspiration Newsletter | .png) |

- Modern and unusual furniture designs by Andrew Kopp
- John Lautner’s sheats goldstein residence
- Ameriwood Black Forest TV Stand
- Great DIY Cheap Windows Curtains
- Starfish Curtain Valance
- A Different Street House in Massachusetts, USA
- The Sculptured Surface Washer
- Coral Reef LED Lamps by QisDesign
- Miami outdoor lighting solution by Giordana Arcesilai
- Practical DIY Woven Cork Ikea Skala Tray
| Modern and unusual furniture designs by Andrew Kopp Posted: 05 Aug 2011 11:00 AM PDT American designer Andrew Kopp is a recent graduate from the Rhode Island School of Design. Like most recent graduates, he is enthusiastic and eager to come up with new ideas that would hopefully impress the others. We'll see of this feeling will persist over the years. He only has a handful of personal designs that he can show us but they are quite spectacular and worth to be shown.
We'll start with a modern bench that he created. It's a combination of beige and brown, a very nice couple that reminds of chocolate and vanilla that gracefully combine. The bench definitely has a modern design and it features a very beautiful silhouette with soft curved lines that makes it perfect for both indoors and outdoors. It's also a nice choice for public spaces like malls or waiting rooms. He also designed another bench but this time the design is quite abstract and even artistic. It's a more complex piece with a sophisticated look.
Anther eye-catching piece is a side table that operates the same principle of combining colors in a natural way. The table features a beautiful base with an architectural look and a simple round top. And since we're talking about tables, there's also a very interesting coffee table featuring an artistic structure that definitely makes it stand out. It also has a glass transparent top that further enhances its beauty. There are also some other interesting designs of this artist and they can all be seen on his website. |
| John Lautner’s sheats goldstein residence Posted: 05 Aug 2011 09:45 AM PDT For those curious to see an unusual and surprising home design, one of the locations where this can be seen is L.A. This fantastic residence is the work of John Lautner and it’s called sheats goldstein residence. The most impressive detail about this place is definitely the unusual design and the way open and closed spaces are combined.
You can easily go from dark, intimate place to a beautiful open area and the transition is neither abrupt or distressing in any way. It’s a very subtle and pleasant transition that comes in a natural way. There are a lot of spaces where you can go if you need some privacy or if you need to relax a little in a quiet place. There are also a lot of open spaces where you can spend your time, alone or with friends and where you can have a great time.
A very interesting feature is the coffered roof that coveres the space between the living room and the entertainment area and goes all the way down to the pool. It’s a very beautiful sample of incredible architectural work, an art piece. The residence also offers very beautiful views that can be admired both from inside and outside. In fact, it’s been designed in a way that makes it blend into the surroundings in a natural way.{found on designboom and pictures by artjocks } |
| Ameriwood Black Forest TV Stand Posted: 05 Aug 2011 08:27 AM PDT Since the invention of television, it has become part of our every day lives. If you look around in every house where you go, you will see at least one TV set in the living room. Well, even if now the TV set is a lot slimmer, it still needs some place to stay. Some people bolt it to the wall , but most of us prefer the more traditional way of placing it on a stand. And I personally prefer wooden TV stands because they look a lot like the other furniture and not like some temporary shelves. Here is a simple, yet very nice TV stand that is perfect for any living room.
It is made of wood or MDF and has a black finish. It also has four interior shelves where you can store different other things like a DVD player, the speakers, a jewel box, a small statue or whatever you think fits the space there. You can buy this stand now for $129.99, but if you surf the web site a bit, you will find many other models of TV stands to choose from. |
| Great DIY Cheap Windows Curtains Posted: 05 Aug 2011 08:10 AM PDT When you first move into a new home it happens that you need many things and sometimes maybe you can afford them all.Here it is an incredible and nice idea for your windows curtains. If you need to dress your windows you can use this idea so that you can enjoy them as quickly as in an hour. You will do some great DIY Cheap Windows Curtains that will look wonderful at your windows.The materials that you need are: fabric, scissors, measure tape, twine, pencil, hammer, thin wooden rail, wood stapler.
Now you need to follow some instructions and everything will be ok.Measure your window's internal space. Measure the same amount of the fabric and cut it. Wooden rail must have the same width as the window so cut it if needed. The wooden rail should be 1.5 cm from the fabric's edge. Bend the fabric on the rail and use staples to fasten it. Measure off the twine 2, 5 times longer that the height of the window.
Toss the twine in the middle of the rail and attach the rail to the top of the window using the hammer. The twine should be in the middle of the window as at the front as at the back of the fabric. You need to tie and pull it up exactly in the middle of the window. You can control the openness of the window with the twine.{found on flashdecor} |
| Posted: 05 Aug 2011 06:31 AM PDT Curtains have an important role in the design of a house because a home with no cover for the windows, even partial, looks empty and unfinished, almost like you are there just temporary, not living on a permanent basis. And modern homes nowadays have just a short curtain in the upper part of the window or just covering a very transparent curtain. This is the valance. The material of choice for the curtain valance is a bit thicker than a regular curtain and has different patterns on. I like these starfish patterns very much, especially if you use the valance in a room with a marine design.
I found two different models of starfish curtain valances and they are both very beautiful. All you have to do is decide which one fits the design of your room and then order it directly on the internet or maybe get inspired by the design and find something similar in your local store. Any way, the first model is sort of brownish/beige background with white starfish and you can purchase it on Country Porch for $29.95/ea and the second one has a heavy weight fabric that makes it look almost like a cornice. It is pinkish with red starfish and has two layers of fabric on top of each other with rounded edges that look fabulous. You can buy the latter for $89.99. |
| A Different Street House in Massachusetts, USA Posted: 05 Aug 2011 05:57 AM PDT East 6th Street House first gives the impression of a simple, modern building, with an interesting shape that makes us think about future and how to use space as well as possible. If we take into consideration, the fact that it is located in Boston, Massachusetts, the entire perspective changes and everything seems to be more normal in a contemporary world. It was built on a rear parcel, which does not allow views of the street, but what is very attractive is the way the sunlight fills the interior and bathes all the corners of the floor.
The lines, the forms and the materials are a re-interpretation of geometric volumes, creating a pleasant mood. The simplicity of the space makes us realize how beautiful and tasteful can such a house be. We do not need artificial things or to overload a place in order to have an ideal home. If we look at the stairs and the brick walls, we already get the picture we wanted to see: quality materials and a great aspect make the difference.
The entire design seems to be an expression of modesty and simplicity in a good sense. The wooden floor and furniture pieces stand for the same idea of a welcoming place in which you feel at ease and this is the most important thing. Touloukian Touloukian Inc. that was in charge with the design of this space did a great job!{found on archdaily and pictures by Stephen Lee Photography} |
| Posted: 05 Aug 2011 05:03 AM PDT The 8 kg Steam Care Washer from Miele is certainly a different kind of washer. It is not only very modern and perfectly equipped, but it also has an interesting design, as if embroidered. This aspect is both strange and attractive, at the same time. You do not expect a washing machine to look different and when it does you do not know how to react; all you have to do is to analyze it in order to figure out if it is what you want or not.
First, the black-white-grey combination makes everything simpler and then the sculptured surface structure of the Miele honeycomb drum creates a thin film of water or air, which protects laundry. Among the most important aspects: this washer model reduces creasing, ensuring easier ironing; at the end of a wash, the 1600 RPM maximum spin speed provides less residual moisture in clothes, it can work with a single burst of steam, with a constant steam delivery or even both. As you can realize, this 20 programs Steam Care washer was rated A+++ . Are there attributes that have not been mentioned yet? Of course there are! The LCD display which definitely draws your attention, the end of cycle indicator, the 24 hours start delay, the time remaining display, the automatic safety door lock, the emergency door release, the access code, all these are only a part of the attributes! You can discover the rest on your own!Available for £1,500. |
| Coral Reef LED Lamps by QisDesign Posted: 05 Aug 2011 04:10 AM PDT Almost every home has a lamp. It's not because it's a standard or an indispensable item, but because it's both useful and beautiful as a decoration. It's an item that people usually buy for the design and for the way it looks. All the lamps have almost the same functionality so the only thing that distinguishes them from the other ones is the aspect. We have a lamp that is definitely unique.
The Coral Reef lamp was designed by Taiwan-based studio QisDesign and it's an LED lamp. There's not a lot to say about the technical area because it's no different than all the other LED lamps. The thing that makes this one unique is obviously the design. As the name suggests, the inspiration source was the ocean, more exactly the corals that lie on the bottom and that are always amazing. However, if I didn't know the name of this lamp I would say it looks like a stylized mushroom, which is not an insult by any kind.
Regardless of what you make the analogy with, the lamp remains equally beautiful and graceful. There are actually two versions of the Coral Reef lamp. One is more simple and has a conic chrome base, the reason why it might look like a mushroom to some people. This one is a table lamp. The other is more complex and is also a floor lamp. Both of them have a very graceful silhouette and they would definitely look splendid in a modern home. |
| Miami outdoor lighting solution by Giordana Arcesilai Posted: 05 Aug 2011 03:49 AM PDT Starting with spring and until autumn people like to spend as much time as they can outdoors or in the nature. It’s logical to be like that if we consider that during winter all we do is stay inside and avoid going out unless it’s really necessary. So for those who are lucky enough to have a house and a garden where you can relax and spend time with friends and family, here’s something you might use in order to make that time more pleasant.
It’s called Miami and it’s a lamp designed for outdoor use. It’s a very functional piece and it has a design that makes it very versatile. The structure of the lamp is made of inox which is not the most durable or strong material available but it seems to be pretty good in this case. Other materials use are granite and fiberglass. The dimensions of the lamp are 50 cm in diameter and 250 cm in height. It uses 1 25W light bulb.
The design of the Miami lamp is rather simple. The base is relatively small and the structure is flexible so it can be inclined at any angle you want. The light it diffuses is warm and gentle, but strong enough to illuminate the outdoor space. The lamp is great for outdoor use because it eliminates the need for any other lighting systems. It seems more private and romantic than a simple light bulb hanging on the wall.Available on antonangeli. |
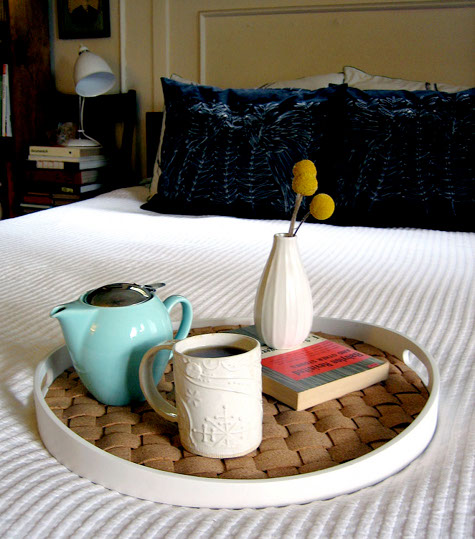
| Practical DIY Woven Cork Ikea Skala Tray Posted: 05 Aug 2011 03:00 AM PDT Ikea represents an amazing brand which everybody appreciates it for its simplistic and practical designs. For those who love these types of things and even would like to create them on their own here it is a nice idea.
Take this Skala Tray from Ikea and following the next instructions you will be able to get a really nice DIY Woven Cork Ikea Skala Tray that can be used for so many things. You may take your tea in bed; you can put a book, a small magazine, and some things that you need to be close to your bed.
Here are the materials that you need: roll of cork (these are available at office, craft, and hardware stores – make sure the cork is at least 20″ wide and the roll needs to be at least 30″ long), craft/utility knife, ruler (preferably as long or longer than the cork roll's width), cutting mat, glue gun, primer spray paint ,painting surface (tarp or large piece of cardboard), marker, scrap paper or cardboard (at least 17″ by 17″),protractor (or pencil and string).
Take your tray to a well ventilated area and put it down on the painting surface. Cover it with an even coat of primer. Allow it to dry for about 15 minutes, and then give it another coat, making sure the sides of the tray, both inside and out, are completely covered. Let the tray dry. (Paint with another color if you desire and let that dry as well.).
While the tray is drying, take your cork roll and lay it on your cutting mat. Press it down to the surface with the curve of the cork facing down (the opposite of unrolling a blueprint or a map, so the cork wants to curl under itself). Use the marker and ruler to mark 1″ strips on the cork.Using the ruler as a cutting guide, slice the cork into 1″ strips with your utility knife. Apply firm pressure and cut in a fluid motion to ensure the cork doesn't tear. You need about 30 strips total, which will probably not be the whole roll of cork. Once you have them all cut, make sure you do not have any uneven or off-measured ones in the bunch. Replace them with new ones if you do. Place 15 strips of cork down (curve side down so the edges point down and not up) and push them up next to each other, leaving no space in between. Also make sure their edges are lined up.
Begin by taking another strip and weaving it through the center of the strips, pulling up every other strip to allow the strip in your hand to fit underneath. Make sure it is aligned parallel to the 15 strips on the floor and not at an angle. Repeat step 6 with another strip, pulling up the opposite strips from the one before it to create an alternating weave. After the strip is woven through, slide it as close the previous strip as possible and adjust it to make sure it is straight. Maintain a tight, clean weave throughout by sliding and adjusting the strips. Repeat with the remaining strip to create a woven square that is 15 strips by 15 strips. Adjust everything to ensure it is tight and straight. Glue the end flap of each strip to the strip underneath it. This will close the woven square and secure all the pieces so you can move the entire piece. Flip the entire piece over. Use the protractor to draw a circle on your scrap piece of paper/cardboard that is 16 and 6/8″ (this is the diameter of the inside of the tray). Cut out this template and use it to trace a circle on the cork. Cut out the cork circle carefully. You will be removing the glued pieces but the weaving should still stay together because it is tightly packed.
Gently flip the woven circle over and place inside the tray. If it does not quite fit in any spots, use your scissors to carefully remove any excess off the sides, until the cork weaving fits perfectly in the tray. Use your glue gun to glue down the weaving all around the edges of the tray. You do not need to glue the center, it will sty put if the edges are secure and the weaving fits in the tray correctly. Remove any splinters of cork from cutting, and any loose strands of hot glue. Make sure all flaps at the edges of the weaving are glued down to the tray, and the cork flaps are glued to the cork strip that lies underneath it on the edges.{found on designsponge} |


| You are subscribed to email updates from Home decorating trends To stop receiving these emails, you may unsubscribe now. | Email delivery powered by Google |
| Google Inc., 20 West Kinzie, Chicago IL USA 60610 | |
0 comments:
Post a Comment